
Yaesu SCULAN10 Integration
The Yaesu SCULAN10 Network Remote Control System is Yaesu’s answer to bringing remote control capabilities to their radios. Unfortunately, as many people found out, it leaves a lot to be desired. It is a closed system, you cannot run any third party applications with it, cannot run digital modes, no access to the memories on the radio…and the list goes on.
Win4Yaesu changes that. All of Win4Yaesu’s functionality is now available over the Internet through the SCU-LAN10, including:
- Almost Full access to the radio’s menu and control system — not just the 15 items Yaesu’s own SCU-LAN10 software exposes, but the radio Menus including all settings like the VOX audio source that were previously only configurable locally at the radio.
- Spectrum scope and audio, streamed over the same connection.
- Six virtual radio instances, so third party software and hardware can connect and use the same connection to the radio.
- All modes supported — nothing is restricted at the SCU-LAN10/Win4Yaesu level.
- Third-party software support — Win4Yaesu lets WSJT-X, N1MM, DXLabs, N3FJP, and many other applications share the single SCU-LAN10 network connection, something the stock Yaesu software cannot do at all.
- This works across the full line of SCU-LAN10-compatible radios: FTDX101D, FTDX101MP, FTDX10, and FT-710.
- You can see a video of it in operation here
Prerequisites
- A licensed copy of Win4Yaesu version 1.508 or later.
- The Win4AddOnPac Download and Purchase
- SCU-LAN10 device, with firmware at least version 3.0. This should be setup and configured with the SCULAN10 Setting Tool.
- FTDX101, FTDX10, or FT-710, all with the latest firmware as of July 2026. Make sure you use a power supply for the SCULAN10 for the FT-710.
Setup
- Step 1: Connect and configure the SCULAN10 device on your network using the “SCULAN Setting Tool” which came with the SCULAN. Make a note of the IP Address and user name and password.
- Step 2: For the FT-710 you must change a menu setting: In the radios menu, Operation Setting, General is an option for the SCULAN. Turn it to ON. In addition, you must check that the baud rate for CAT-1 is 38400.
- Step 3: Make sure you have downloaded and ran at least one app of the Win4AddOnPac. (AudioStation recommended)
- Step 4: Disconnect from the radio you are currently using from the Tools, Settings menu in Win4Yaesu.
- Step 5: When you restart the software you will see the following menu:
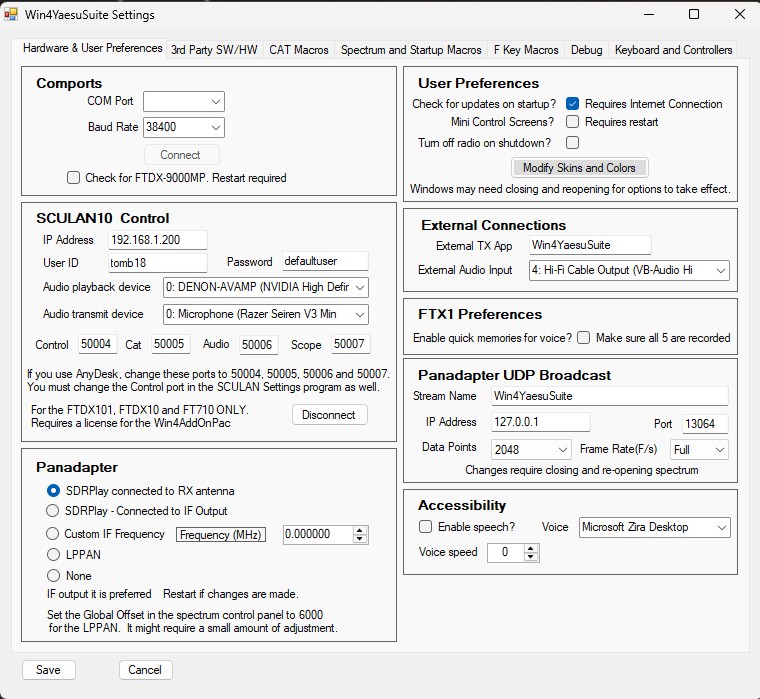
The section of interest is the SCULAN 10 Control section. You will need to provide values for each of the fields in this section:
- IP Address: This is the address of the SCULAN. You will have previously set this up with the Yaesu software.
- User ID and Password: Again this was set up with the Yaesu software when you configured the SCULAN.
- Audio Playback Device: This is the sound device you have on your system that is typically connected to your speakers or headset. On first run, this usually defaults to your system’s default audio device.
- Audio Transmit device: This is usually a microphone. usually a microphone, though it can be another input depending on your setup.
- The SCULAN uses UDP ports 50000, 50001, 50002, and 50003 by default. However, these ports may be taken by AnyDesk and its service, so if you run AnyDesk you must change this. You will need to open the SCULAN Settings tool, login and change the Control port to 50004. Yu then change the ports shown above to 50004, 50005, 50006, and 50007 (or 50011,50012, 50013, and 50014).
- External Connections: This option controls what enables PTT and which audio device is used when the AudioStation is used with Win4Yaesu. The External TX App field is the name of the connection (Named Pipe) and it must match the corresponding name in the AudioStation. The External Audio Input is the device you want to use as a “microphone” to send the audio to the radio. If you use the actual microphone (like shown in the Audio transmit device section above) then sound from the mic AND sound from the audio station will be output simultaneously. If you use a virtual audio cable (see below) then it will be a dedicated sound channel to the radio.
Once you have filled out these parameters, click Connect and then Save.
Using VOX
It is possible to use VOX with the SCULAN. This will introduce a small delay while the radio energizes the circuit. It won’t be noticeable to you but might be important during fast moving contests. If that is the case, use PTT direct using the spacebar. You could also use a foot switch that emulates a keyboard and provides a “space bar”.
To use VOX there are a few things you need to set up. First in the menu of the radio, (Tools, Radio Menu Items), navigate to Operations Settings, TRX General and in there change VOX SELECT to DATA. VOX will then use the LAN connection for the VOX function. Next in the same menu is an entry DATA VOX GAIN. What this is set to depends on how “hot” your microphone is. Try 025 to start. Close the menu, set your power down to zero and then press the VOX button in Win4Y. The mic is now “live” and most likely will start triggering immediately.
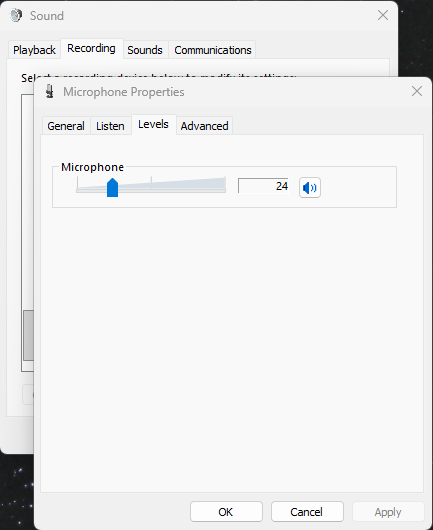
Next you will want to set the VGain about a 1/4 of the way up and VDelay (which is actually Hang time) around 1/2 way. Most likely at this point the mic is still too hot. Open the Windows control panel (Old panel…type control in search bar) and click on Sound. Next click on the Recording tab. Select your mic and then Properties, then Levels. Set the level to about 1/2 way. For my Razer mic I need it at 25. That should tame things. Otherwise reduce it more, or, if your mic is very insensitive you may need to put it on maximum. You will need to experiment with those values.
Using Win4Yaesu and the SCULAN for programs like WJST
To use Win4Yaesu and the SCULAN for software that requires sound input like WSJT you will need to download a virtual audio cable (VAC). These are typically free — the recommended one is VB-Audio Hi-Fi Cable, available at vb-audio.com/Cable (about three-quarters of the way down the page). You will also need this for the Win4AddOnPac’s Audio Recorder.
- Install the VAC.
- Open Tools, Settings in Win4Yaesu and select the Audio playback and Audio transmit devices which you just downloaded.
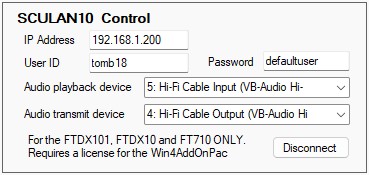
- To configure WSJT, select File, Settings and then click on the audio tab. You will see the following.

Set it up to be the same as in the above picture and click save.
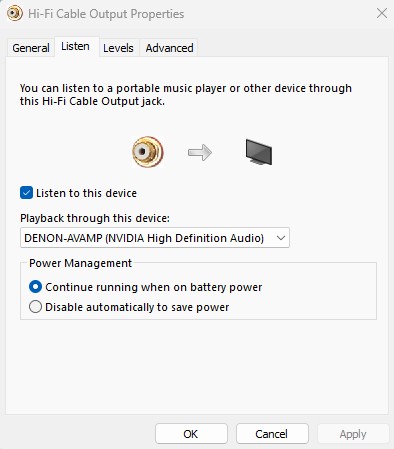
- In order to actually hear the audio in this connection there is one additional step: Open the old windows control panel and select Sound. Select the recording tab and then the Hi-Fi cable device. Click Properties. In the Listen tab, click on Listen to this device and select the audio output device on your system as shown below:
CAT/radio control configuration for WSJT-X and other third-party software follows the same process described in the Third-Party Software Integration section of the Win4Yaesu user manual and video tutorials — the SCU-LAN10 connection is handled transparently once Win4Yaesu is connected to the radio.